 Save
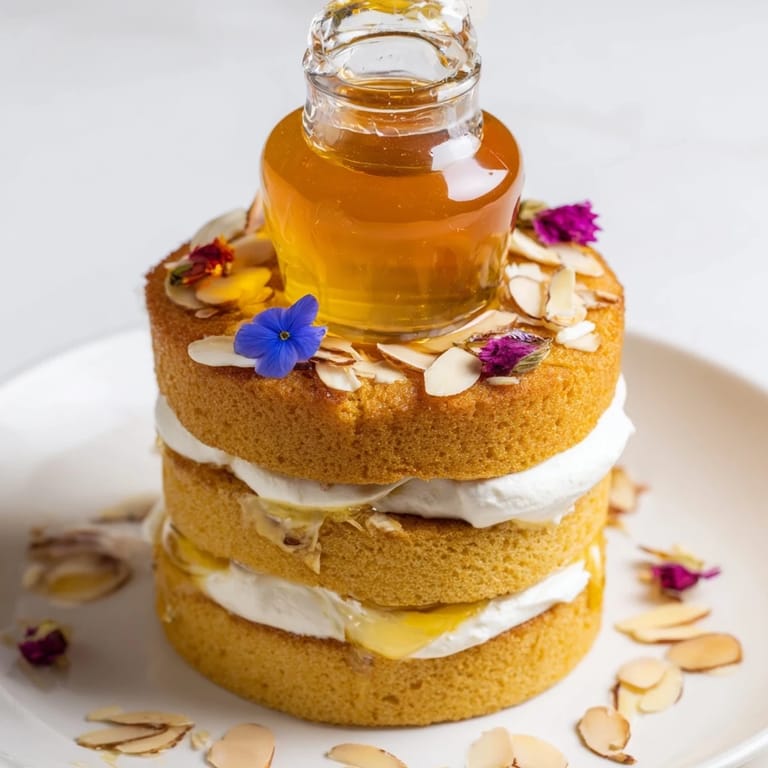
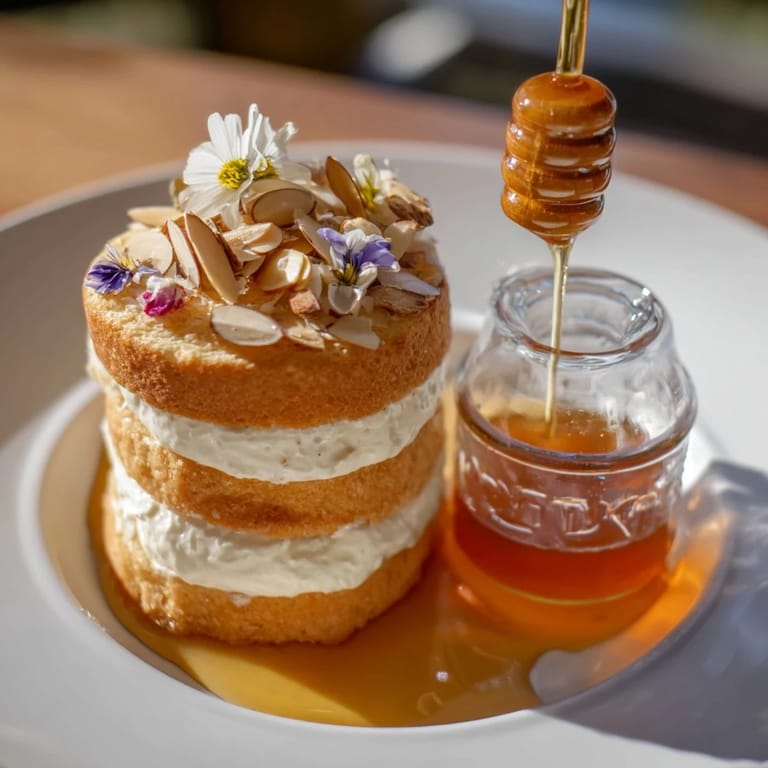
Save There's something magical about watching honey move. Years ago, a friend served me dessert at her dinner table where a pot of golden honey sat nestled inside a cake, and guests would cut into it, letting the warmth spill over each bite. I was transfixed—not just by how beautiful it looked, but by how it transformed the entire eating experience into something participatory and alive. That night I went home determined to recreate that moment, and this honey-drip cake became my love letter to that memory.
I baked this for my sister's birthday last summer, and the kitchen filled with the scent of honey caramelizing at the edges of the cake layers. When we set it down at the table and guests dipped their forks into the warm pot of honey, their faces lit up with genuine wonder. That's when I realized this isn't just a dessert—it's a shared experience, a small ceremony everyone gets to participate in.
Ingredients
- All-purpose flour (2 cups): Use fresh flour for the best rise; old flour can make your cake dense and heavy.
- Baking powder and baking soda (1½ tsp and ½ tsp): These work together to lift the cake, creating layers that are tender enough to hold honey without becoming soggy.
- Unsalted butter and granulated sugar (½ cup each): Creaming these together for several minutes creates air pockets that keep the cake light and fluffy.
- Honey (½ cup for batter): Use mild honey here so it blends smoothly; save the floral varieties for the center pot.
- Eggs (3 large): Room temperature eggs incorporate more smoothly and add structure to hold the layers.
- Vanilla extract (1 tsp): This small addition deepens the flavor without overpowering the honey.
- Whole milk (¾ cup): The slight acidity helps activate the baking soda and keeps the crumb tender.
- Heavy cream (1 cup): Whipping cream to stiff peaks creates a stable filling that won't weep between layers.
- Mascarpone cheese (¼ cup): This adds richness and tang to the filling, preventing it from tasting one-dimensional.
- High-quality liquid honey for serving (1 cup): This is your star ingredient—choose something special like wildflower or acacia that you actually want to taste.
- Toasted almonds (¼ cup chopped): Toasting brings out their flavor and adds textural contrast to each bite.
Tired of Takeout? 🥡
Get 10 meals you can make faster than delivery arrives. Seriously.
One email. No spam. Unsubscribe anytime.
Instructions
- Prepare your stage:
- Preheat your oven to 350°F and take a moment to grease and line two 8-inch round pans. Having everything ready before you start mixing makes the process smooth and prevents the batter from sitting too long.
- Mix your dry foundation:
- Whisk flour, baking powder, baking soda, and salt together in a bowl. This distributes the leavening agents evenly throughout so you get consistent rise.
- Cream butter and sugar:
- Beat softened butter and granulated sugar together for about 3 minutes until it looks pale and fluffy like clouds. This incorporates air into the batter, which gives the cake its tender crumb.
- Build the batter:
- Add honey, eggs, and vanilla to the butter mixture and beat well until combined. Then alternate adding dry ingredients and milk, starting and ending with dry—this prevents overmixing and keeps the cake tender.
- Bake the layers:
- Divide batter evenly between pans and bake for 22–25 minutes until a toothpick comes out clean. Cool the cakes completely before you touch them; warm cake crumbles and falls apart.
- Make the honey cream:
- Whip heavy cream to soft peaks, then add honey and mascarpone and whip to stiff peaks. Chill this until you're ready to assemble so it stays sturdy between layers.
- Slice and stack:
- Carefully slice each cooled cake horizontally to create four thin layers total. Place the first layer on your serving platter, spread generously with honey cream, and repeat with remaining layers, creating a tower of honey-infused cake.
- Create the honey well:
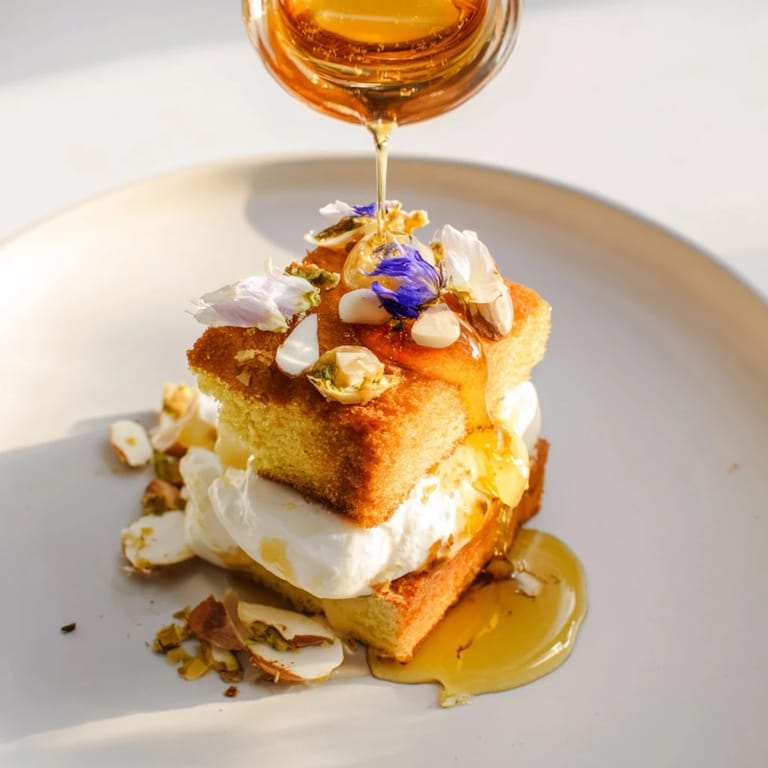
- Using a 3-inch round cutter, carefully cut a hole from the center of the stacked cake, going all the way through. Gently remove the center and place a small glass or ceramic honey pot into the opening, making sure it sits level and stable.
- Fill and garnish:
- Pour your best honey into the pot at the center and crown the top of the cake with toasted almonds, edible flowers if you're using them, and a drizzle more honey. Step back and admire your work—this is beautiful.
 Save
Save I once served this to a table of skeptics who thought the honey pot was just for show. By the end of dessert, everyone was fighting over the last bites dipped in that warm, golden center. That's when I understood that sometimes the best recipes aren't about technique or ingredients—they're about creating a moment everyone wants to be part of.
Choosing Your Honey
The honey you pour into that center pot deserves real thought. Mild varieties like acacia honey let the cake shine, while floral types like wildflower or lavender honey add an unexpected sophistication. I've experimented with orange blossom honey, and it transforms the entire experience—each bite tastes subtly different, surprising your palate in the best way. Sample a small spoonful of any honey you choose before committing; this ingredient is too prominent to use something you don't genuinely love.
The Art of Thin Layers
Slicing each cake horizontally requires a steady hand and a sharp serrated knife, but it's worth the care. The thinner your layers, the more surfaces you have for honey cream, and each bite becomes more balanced and luxurious. I use a cake leveler or dental floss as a guide, creating even slices that stack beautifully. Some people worry their layers will fall apart, but a cooled cake is surprisingly sturdy if you work gently and let the filling do its job of holding everything together.
Serving and Pairing
This cake shines when served at room temperature, which is when the flavors are most vivid and the honey flows most easily. A glass of Moscato or late-harvest Riesling beside each plate creates a moment of pure indulgence—the wine's sweetness and floral notes echo the honey and cake beautifully. For a nut-free version, simply omit the almonds and let edible flowers or a simple honey drizzle be your garnish instead.
- Serve this cake within a few hours of assembly, when the layers are still distinct and the honey pot feels like a gift waiting to be opened.
- If you need to make it ahead, assemble everything except the center honey pot, then add it just before guests arrive so the honey tastes fresh and warm.
- Remind your guests to slice generously and let them discover the honey on their own—their reactions are half the joy.
 Save
Save This cake reminds me why I love to cook—not because I'm chasing perfection, but because I'm creating moments where people feel cared for. Every time someone cuts into it and watches the honey flow, I see that same wonder I felt at my friend's table all those years ago.
Recipe Help & Answers
- → What type of honey works best for this dessert?
Wildflower or acacia honey is preferred for its smooth texture and floral aroma, enhancing the dessert’s natural sweetness.
- → Can I replace mascarpone in the honey cream filling?
Yes, alternatives like cream cheese or whipped ricotta can be used, but mascarpone offers a creamy richness that complements the honey.
- → How do I create the central honey pot in the cake?
After layering and stacking the cake, use a 3-inch round cutter to remove the center, then place a small glass or ceramic pot filled with warm honey into the cavity.
- → What is the best way to slice and serve this dessert?
Cut slices around the central pot, allowing guests to dip each piece into the warm honey for added moisture and flavor.
- → Are there nut-free options for garnish?
Yes, simply omit the toasted almonds and consider additional edible flowers or fruit for decoration instead.