 Save
Save I'll never forget the first time I built this log cabin appetizer at a winter dinner party. My friend Sarah had challenged me to create something that would make guests smile before they even tasted it, and as I arranged those pretzel rods and cheese slices on the platter, watching the cabin take shape, I realized I'd stumbled onto something magical. It wasn't just food anymore—it was edible architecture, a little moment of play in the middle of a grown-up evening.
I made this for my daughter's school fundraiser potluck, and watching the kids gather around before anyone else had even arrived told me everything I needed to know. They didn't want to eat it—they wanted to understand it, to see how I'd made cheese and pretzels stand up like that. That's when I knew this recipe was special.
Ingredients
- 24 large pretzel rods: These are your structural backbone, and they need to be sturdy enough to support the weight without snapping. The larger they are, the more architectural possibilities you'll have. I learned the hard way that thin pretzel sticks won't work—go for the substantial kind you'd find in the bulk section.
- 10 oz sharp cheddar cheese, sliced into planks: Sharp cheddar gives you that rich, slightly tangy flavor that makes people come back for more. Cut your slices about 4 to 5 inches long and a half-inch thick so they're substantial enough to lean against the pretzels without flopping.
- 8 oz mozzarella cheese, sliced into planks: Mozzarella is your milder cheese, the one that lets the pretzel shine through. It also adds a creamy texture that balances the cheddar's boldness.
- ½ cup whipped cream cheese or soft cheese spread: This is your mortar, your edible glue. It keeps everything from tumbling down and adds richness to every bite. Room temperature cream cheese works best because it spreads without tearing the cheese slices.
- 2 tbsp chopped fresh chives or parsley: Fresh herbs are what transforms this from clever to elegant. They add a whisper of garden freshness that makes people pause and notice.
- 1 small red bell pepper, diced: Those little red pieces become flowers peeking through the cabin walls or details on your chimney. They're optional, but they're the difference between cute and unforgettable.
- Crackers for serving: These are your supporting cast, giving guests something to build their perfect bite with.
Tired of Takeout? 🥡
Get 10 meals you can make faster than delivery arrives. Seriously.
One email. No spam. Unsubscribe anytime.
Instructions
- Set up your canvas:
- Find your serving board or platter—something with edges so everything feels contained and intentional. Rectangular is best because it mimics the natural shape of a cabin, but honestly, any platter will work. This is where your creation lives, so pick something you're proud to put on the table.
- Slice your cheese like you're building blocks:
- Take your cheddar and mozzarella and cut them into long, even rectangles, about 4 to 5 inches long and a half-inch thick. Consistency matters here because uneven slices will make your cabin lean and wobble. Use a sharp knife and a steady hand—pretend you're a stonemason, because in a way, you are.
- Create your foundation:
- Lay down your first layer of pretzel rods, arranging them in a rectangle about 6 by 4 inches. This is your cabin's frame, so make it solid. Don't worry about perfection—rustic is the whole point.
- Begin layering your walls:
- Take a cheese slice and lean it against the inner edge of your pretzel frame. Now add another pretzel on top of that cheese, then another cheese slice. You're building layers, each one supporting the next. Use small dollops of that soft cream cheese like mortar between layers if things feel loose. A tiny spoon is your best friend here—just little dabs where you need stability.
- Stack with intention:
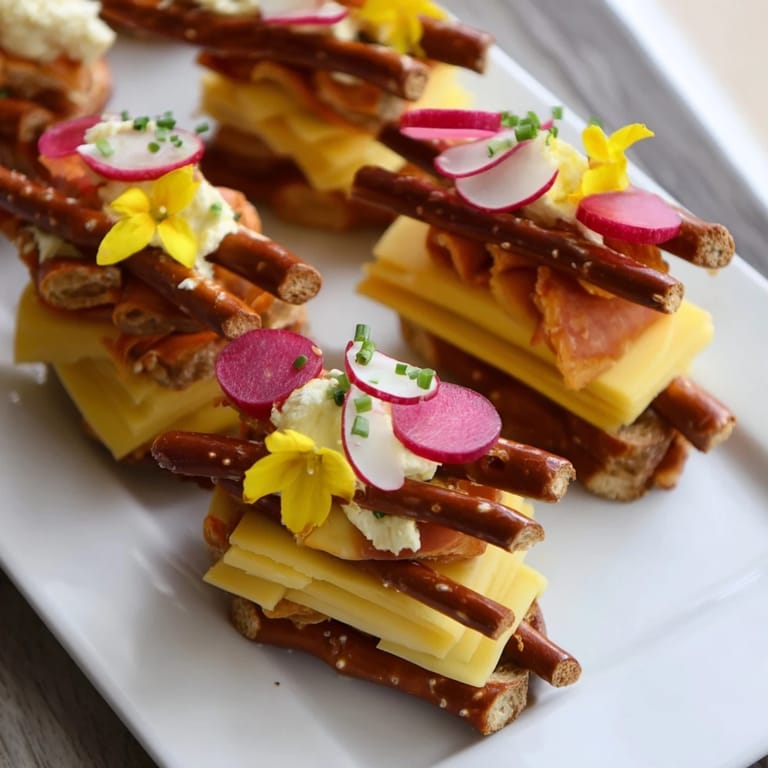
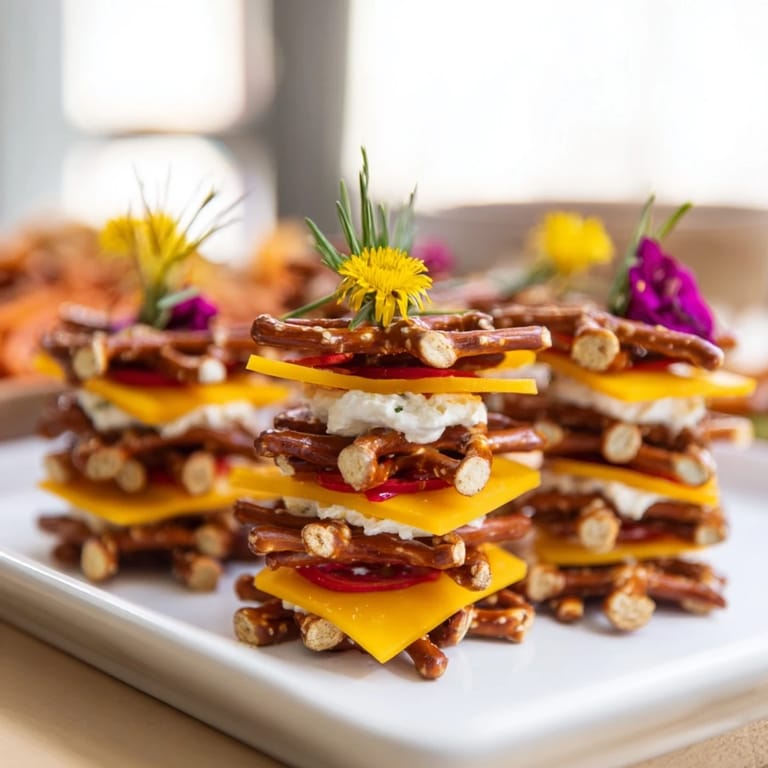
- Keep alternating: pretzel, cheese, pretzel, cheese. Watch your cabin grow. It should feel sturdy but still delicate, like a structure built with care rather than brute force. Aim for 4 to 5 layers before you stop, or until your cabin reaches the height that feels right to you.
- Crown your cabin:
- Finish your top layer with cheese—a nice visible layer that looks intentional. This is what everyone sees first, so make it beautiful. If you want to get fancy, arrange your cheese slices at an angle to look like a pitched roof.
- Add personality:
- Take those diced red bell pepper pieces and scatter them as if they're flowers growing around your cabin or details on a chimney. Sprinkle your fresh chives or parsley over everything like you're decorating with edible confetti. Step back and look at what you've made. This is the moment when a snack becomes a creation.
- Finish and serve:
- Arrange your crackers around the cabin on the platter. This gives guests an invitation to interact with your creation. When you put this on the table, watch people's faces. That moment of recognition and delight—that's why we cook.
 Save
Save I'll remember the way my mother-in-law actually gasped when she saw this cabin on the table, and how she asked if she could take a photo before eating it. In that moment, I understood that some food is about more than nourishment—it's about creating a memory that makes people feel special, seen, and delighted.
Making It Your Own
This recipe is a canvas, and you're the artist. Smoked cheddar brings a campfire warmth that feels authentic to the log cabin theme. Pepper jack adds a gentle heat that sneaks up on you. Gouda, if you can find slices, brings a deep caramel note that's absolutely worth trying. I've even done a layer of sliced apple for a subtle sweetness that nobody expects but everyone remembers. The beauty of this recipe is that it invites creativity without demanding it. Start simple, and once you've made it a few times, you'll know exactly which cheeses sing in your kitchen.
The Story Behind the Snack
I created this recipe on a random Tuesday because I was tired of serving the same cheese and crackers platter that shows up at every party. I wanted something that would make people pause, think, and then smile. That's when I grabbed a pretzel rod from the pantry—remember those from childhood snack mixes?—and stacked it next to a slice of cheddar. Suddenly, I was building something three-dimensional, something that required thought and design. The first log cabin I made was lopsided and looked more like a beaver dam, but it made my family laugh so hard that I knew I was onto something good.
Timing and Preparation
The magic of this recipe is that you can prepare most of it ahead. Slice all your cheeses an hour before your guests arrive and layer them between parchment paper so they stay fresh. Cut your red pepper and chop your herbs and store them in small bowls. When it's time to assemble, everything comes together in about 10 minutes, which means you can stay present with your guests instead of frantically finishing appetizers in the kitchen. The cabin itself is best made within 2 hours of serving so everything stays fresh and the cream cheese doesn't get too soft, but honestly, if you're serving it within 4 hours, it still holds beautifully.
- Slice your cheese at room temperature so it's pliable and won't tear
- Keep your cream cheese soft by leaving it out for 15 minutes before you start building
- If your cabin starts to lean, a tiny dollop of cream cheese on the side can prop it back up without being noticeable
 Save
Save Every time I make this, I think about how the simplest ingredients can become extraordinary when we approach them with a little playfulness and intention. This cabin has shown up at birthday parties, office potlucks, and holiday gatherings, and it never stops being the thing people talk about first.
Recipe Help & Answers
- → What cheeses work best for this layered appetizer?
Sharp cheddar and mozzarella offer contrasting flavors and textures, while firm slicing ensures neat layering.
- → How do I assemble the layers to keep them stable?
Use dollops of whipped cream cheese as a mortar between layers to hold the pretzel rods and cheese slices firmly together.
- → Can I customize the garnish details?
Yes, diced red bell pepper adds color for floral or chimney accents, and fresh chives or parsley bring a rustic touch.
- → Is a gluten-free version possible?
Substitute gluten-free pretzel rods to accommodate gluten sensitivities without altering the assembly process.
- → How long should the appetizer sit before serving?
It can be served immediately after assembly, but resting a few minutes helps flavors meld and layers settle.